Wall Bay Design
This guide provides comprenensive instructions and specifcations for creating a consistent and engaging Midea storefront design. It covers design logo usage principles, construction standards, and installation guidelines to ensure brand integrity and customer satisfaction.
Midea Logo
- Three-dimensional logo made from high-quality materials with a metallic finish.
- Back illumination.
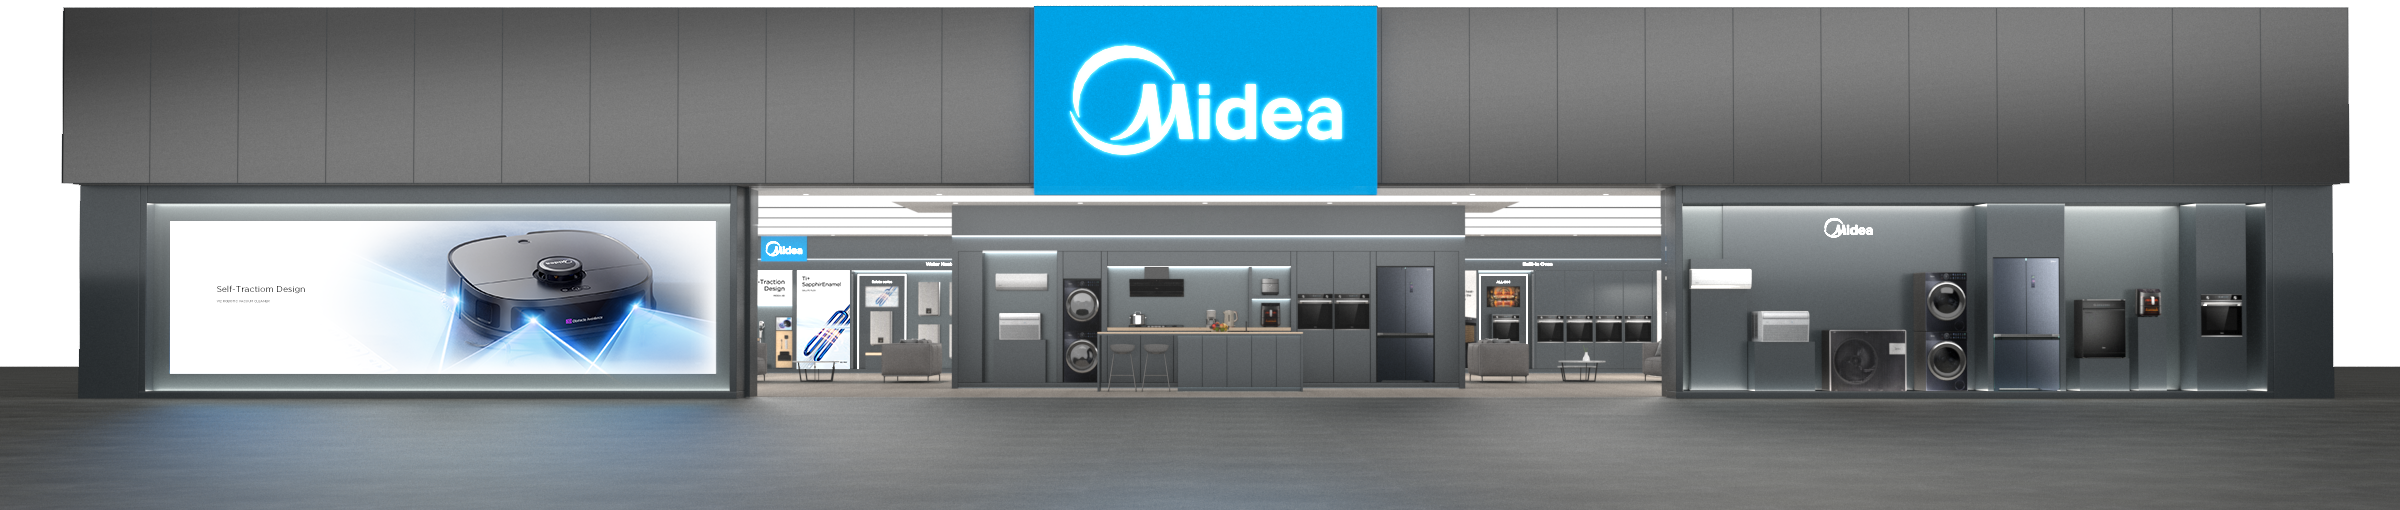
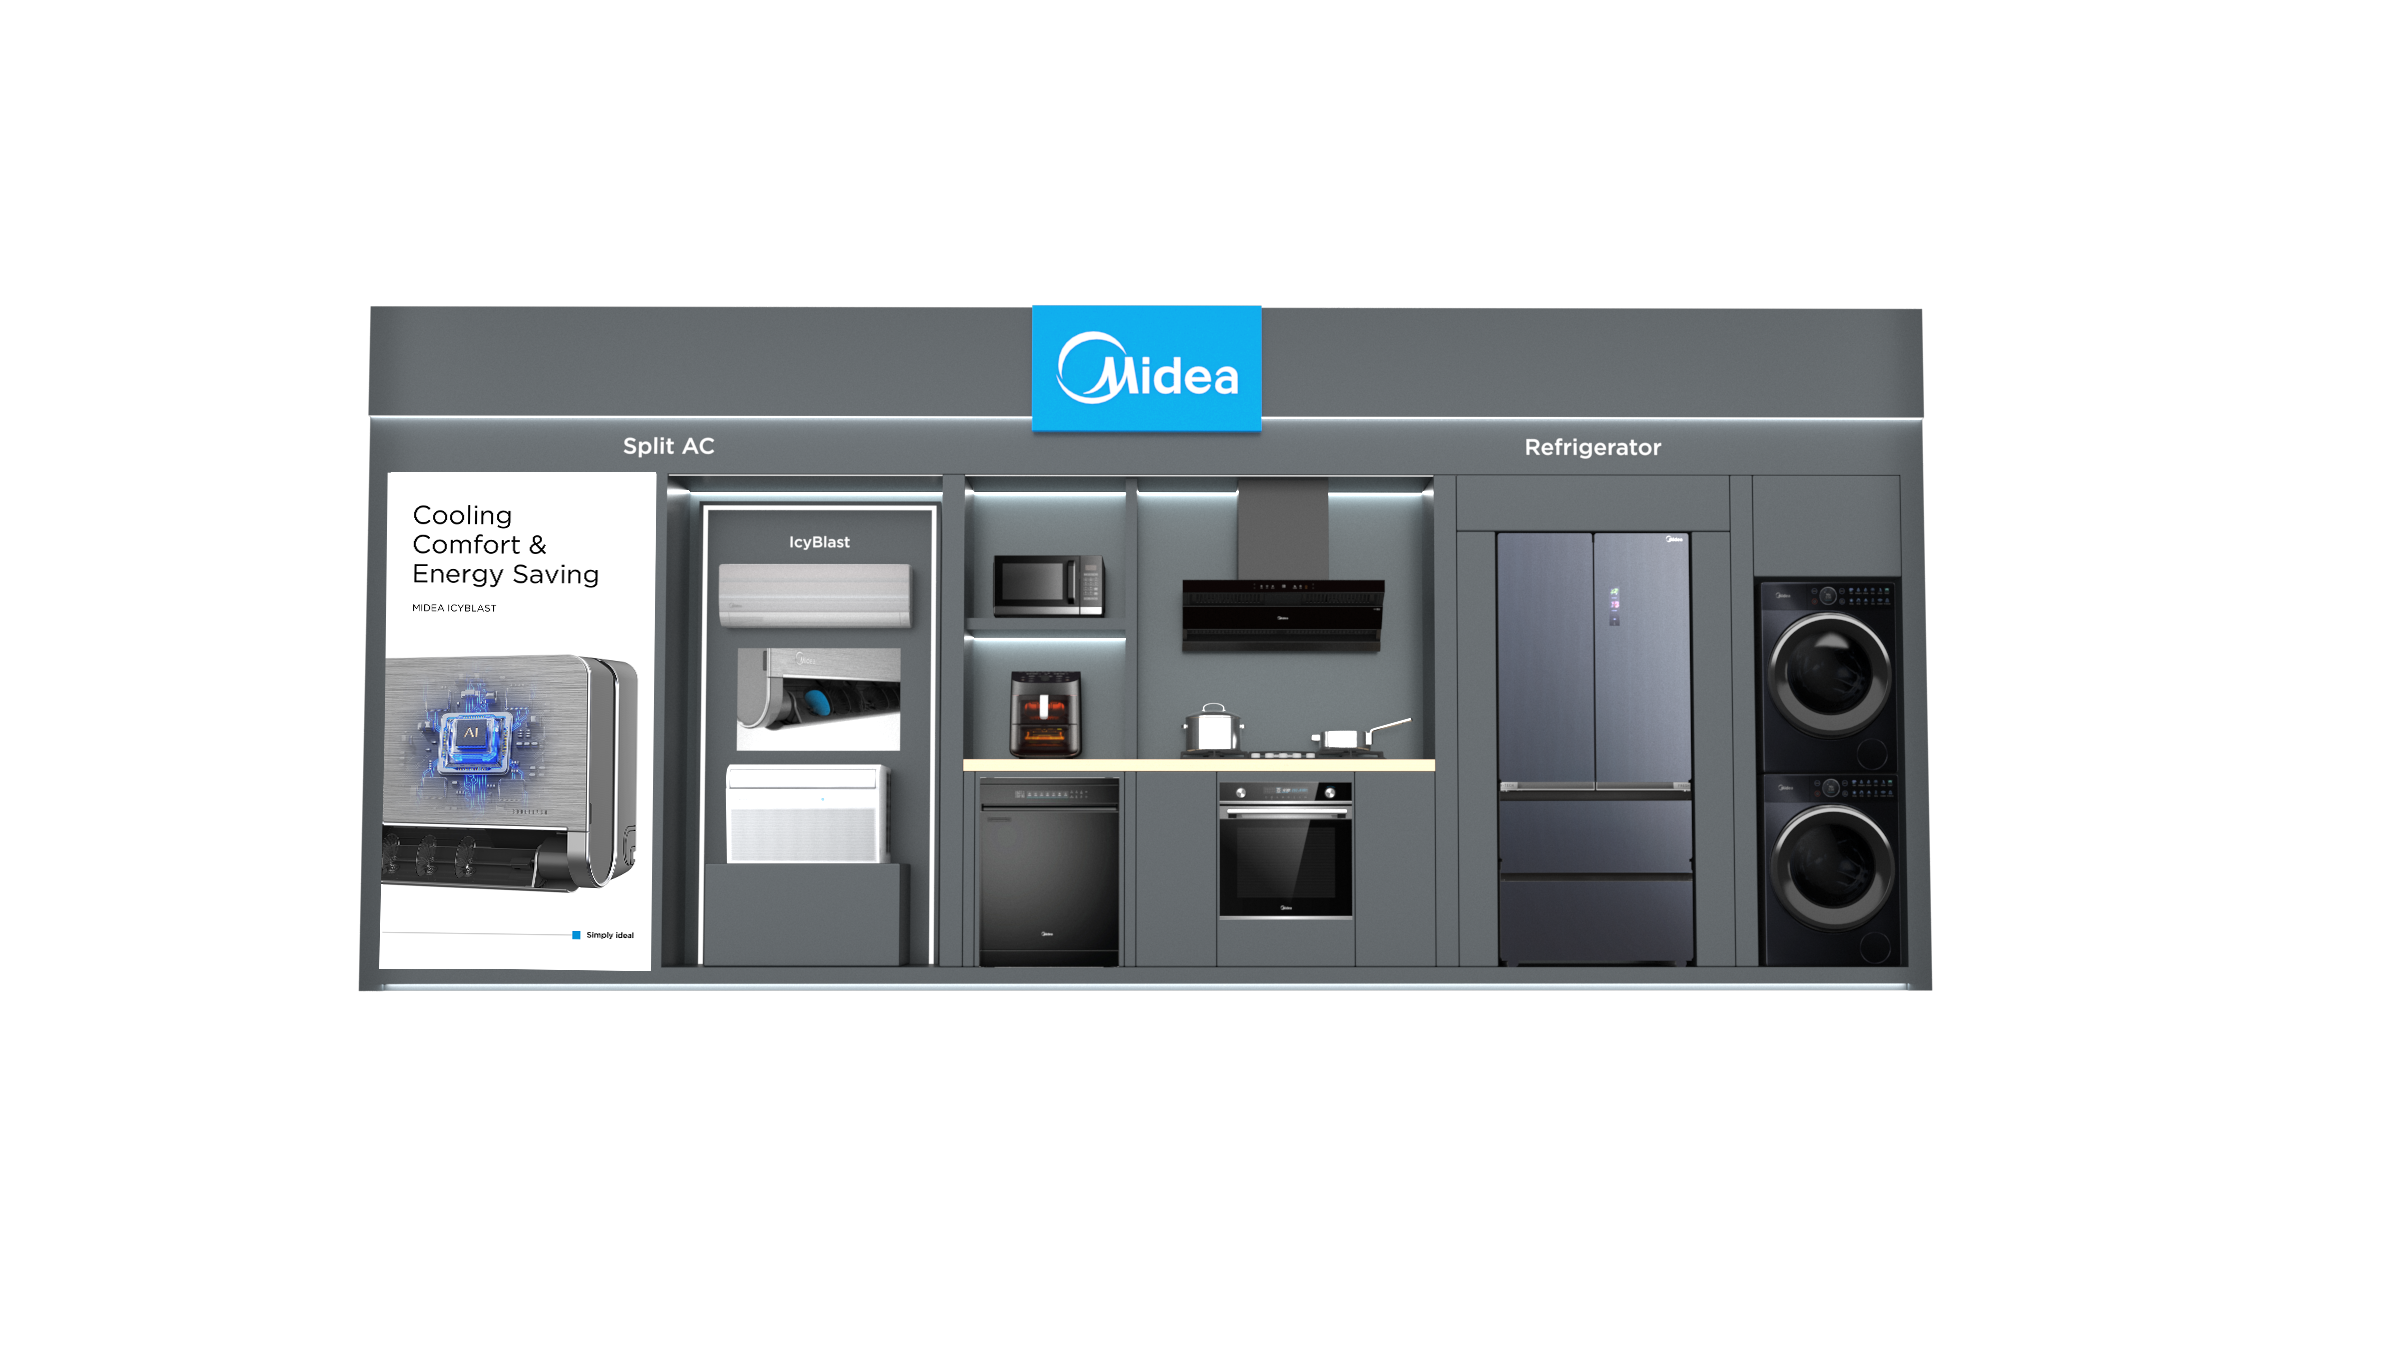
Hero Highlight Display (Right)
- Window showcase of hero products from different categories.
Storefront
- Large, pristine windows with minimal framing.
- Facade made of high-quality materials like stone or textured metal panels.
Branding Display (Left)
- Large screen playing the latest brand video.
Branding Display Hero Highlight Display
Structure Specifications
Indoor Material
Outdoor Signage Material
Signage Illumination

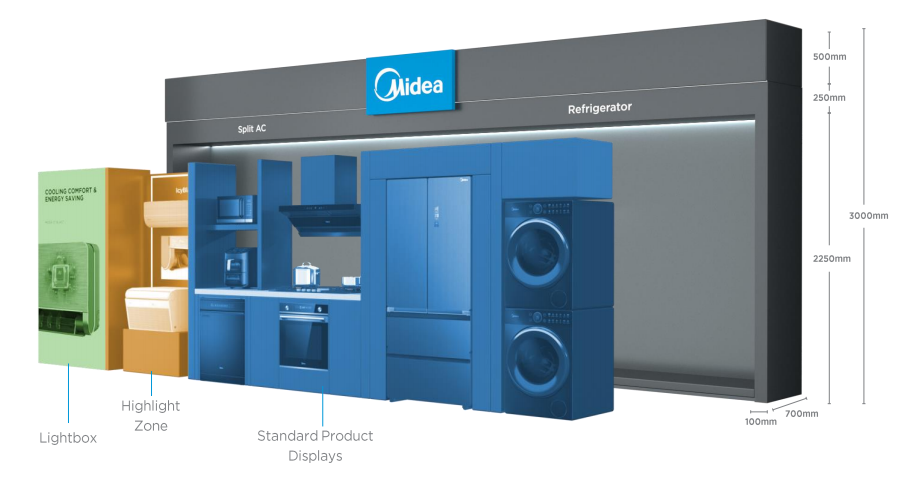
Wall Bay Design
The standardization of the framework is crucial, ensuring consistency, aesthetic appeal, and functional design across all wall bay configurations.
Flexibility and Customization
Modular wall partitions offer easy reconfiguration of display areas to accommodate various products and layouts with minimal structural changes.
Ease of Installation
Designed for swift and straightforward installation and dismantling, modular partitions facilitate quick display updates.
Space Management
Create dedicated sections for different product categories, optimizing theoverall brand presentation.
Aesthetic Appeal
Clean, minimalist shopping ambiance to direct customer attention towards products or features.

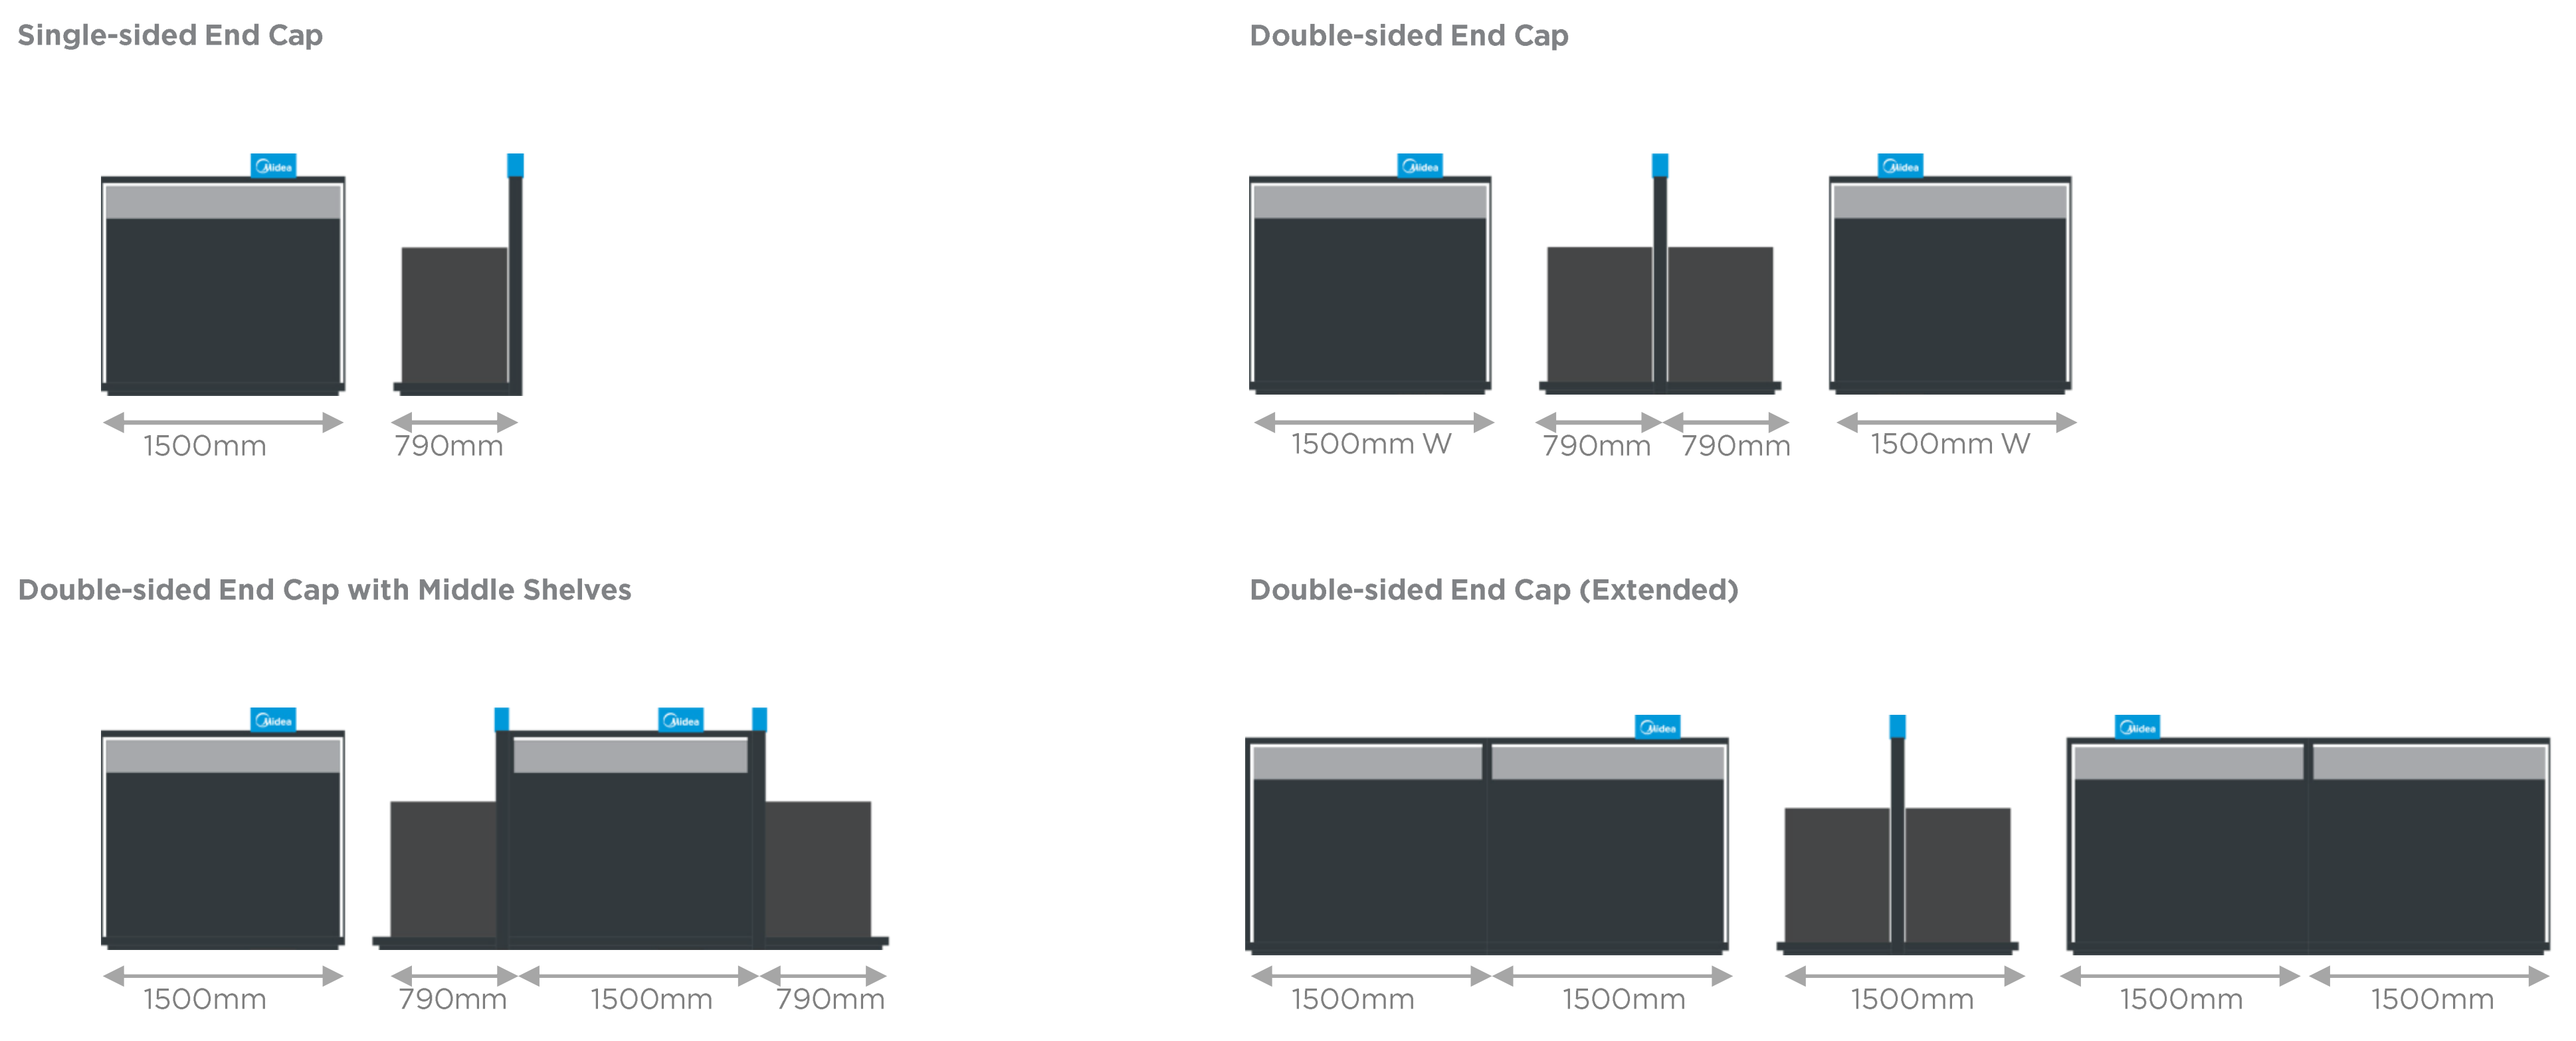
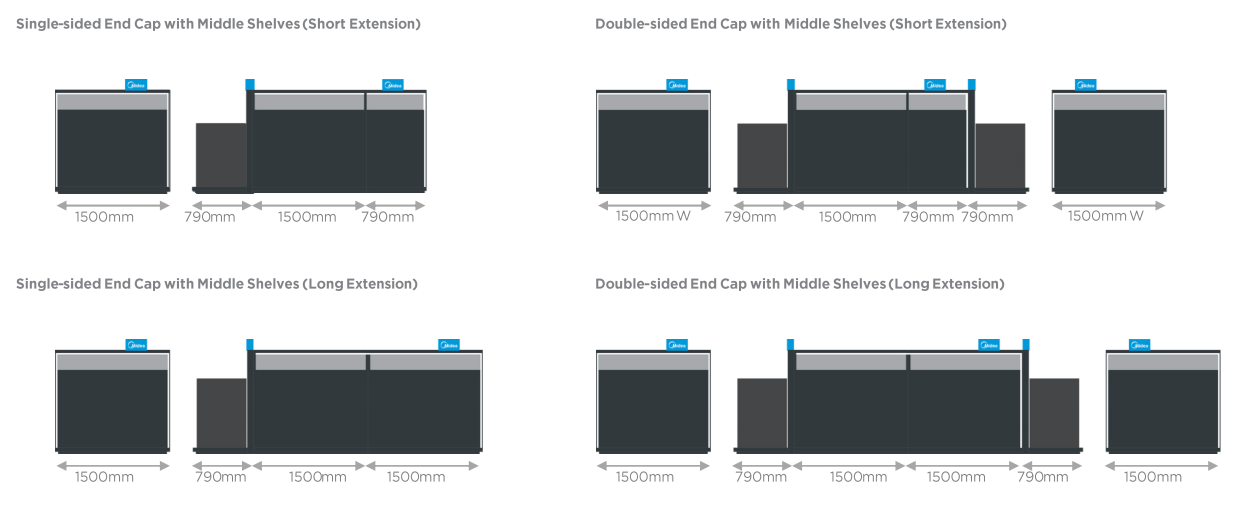
Design Standardization
Structure Height Guidelines
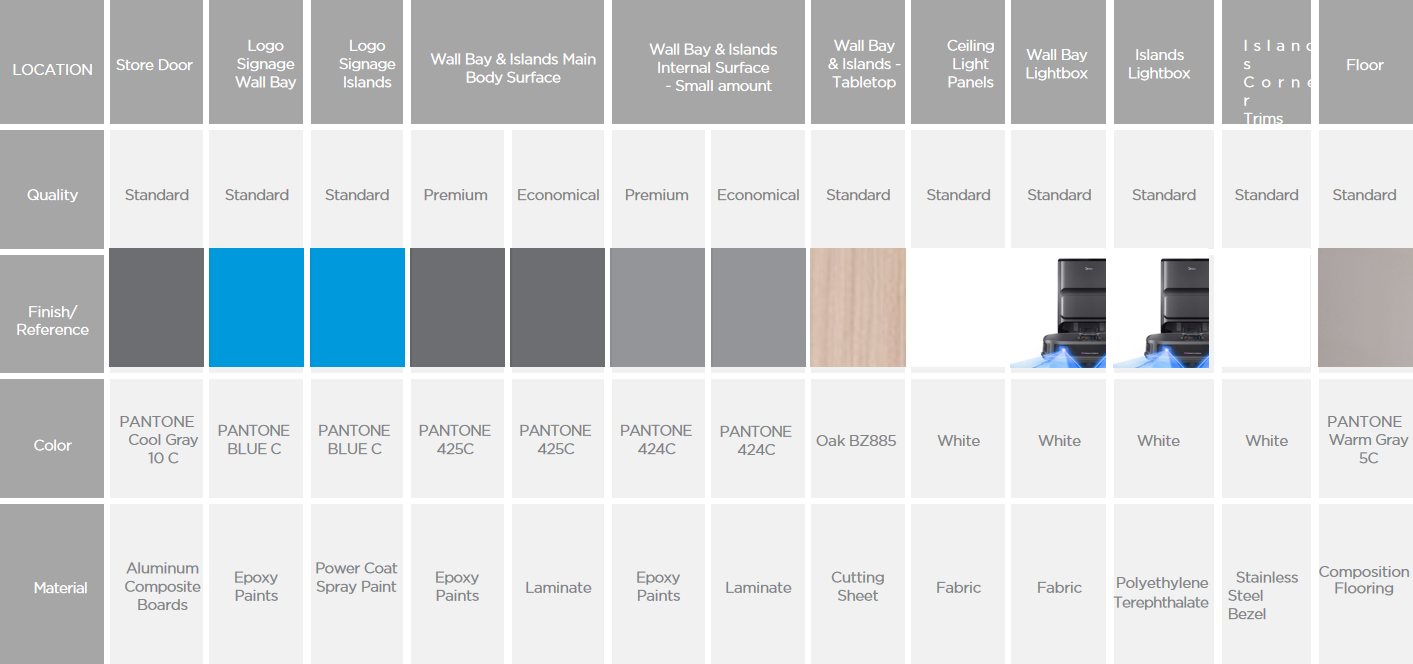
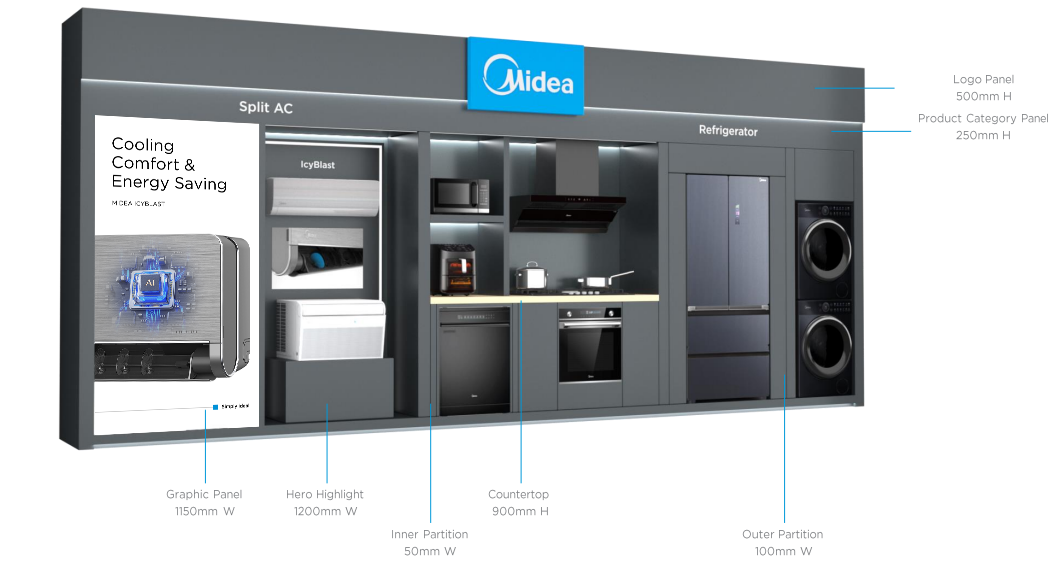
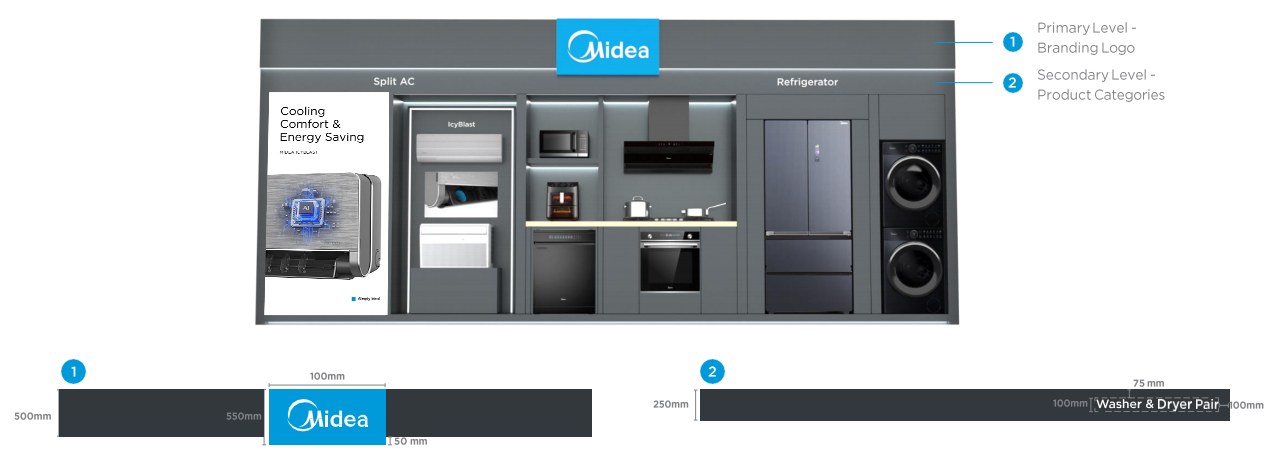
On the same wall, you need to follow the guide to display the logo and product categories.
The size is as shown in the figure below.
When the wall length is> 6m, 2 or more logos should be made.
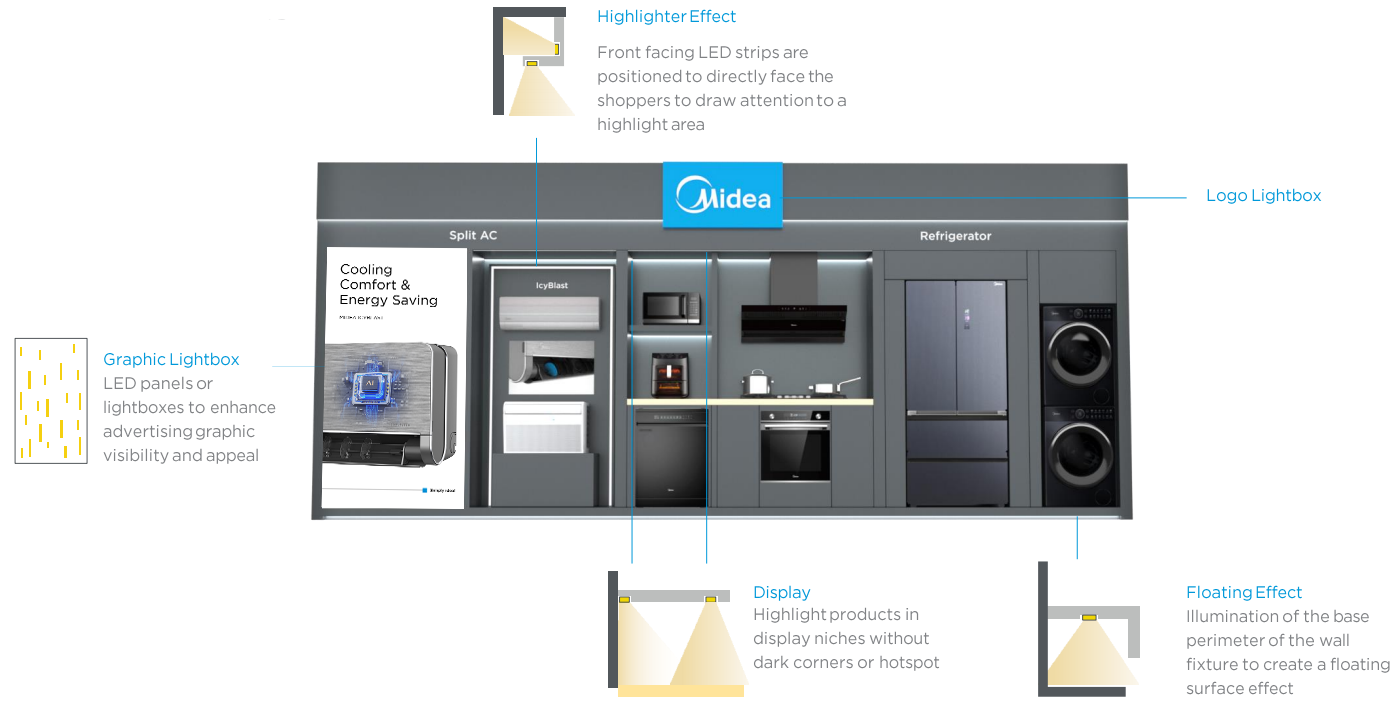
Lighting Guidelines
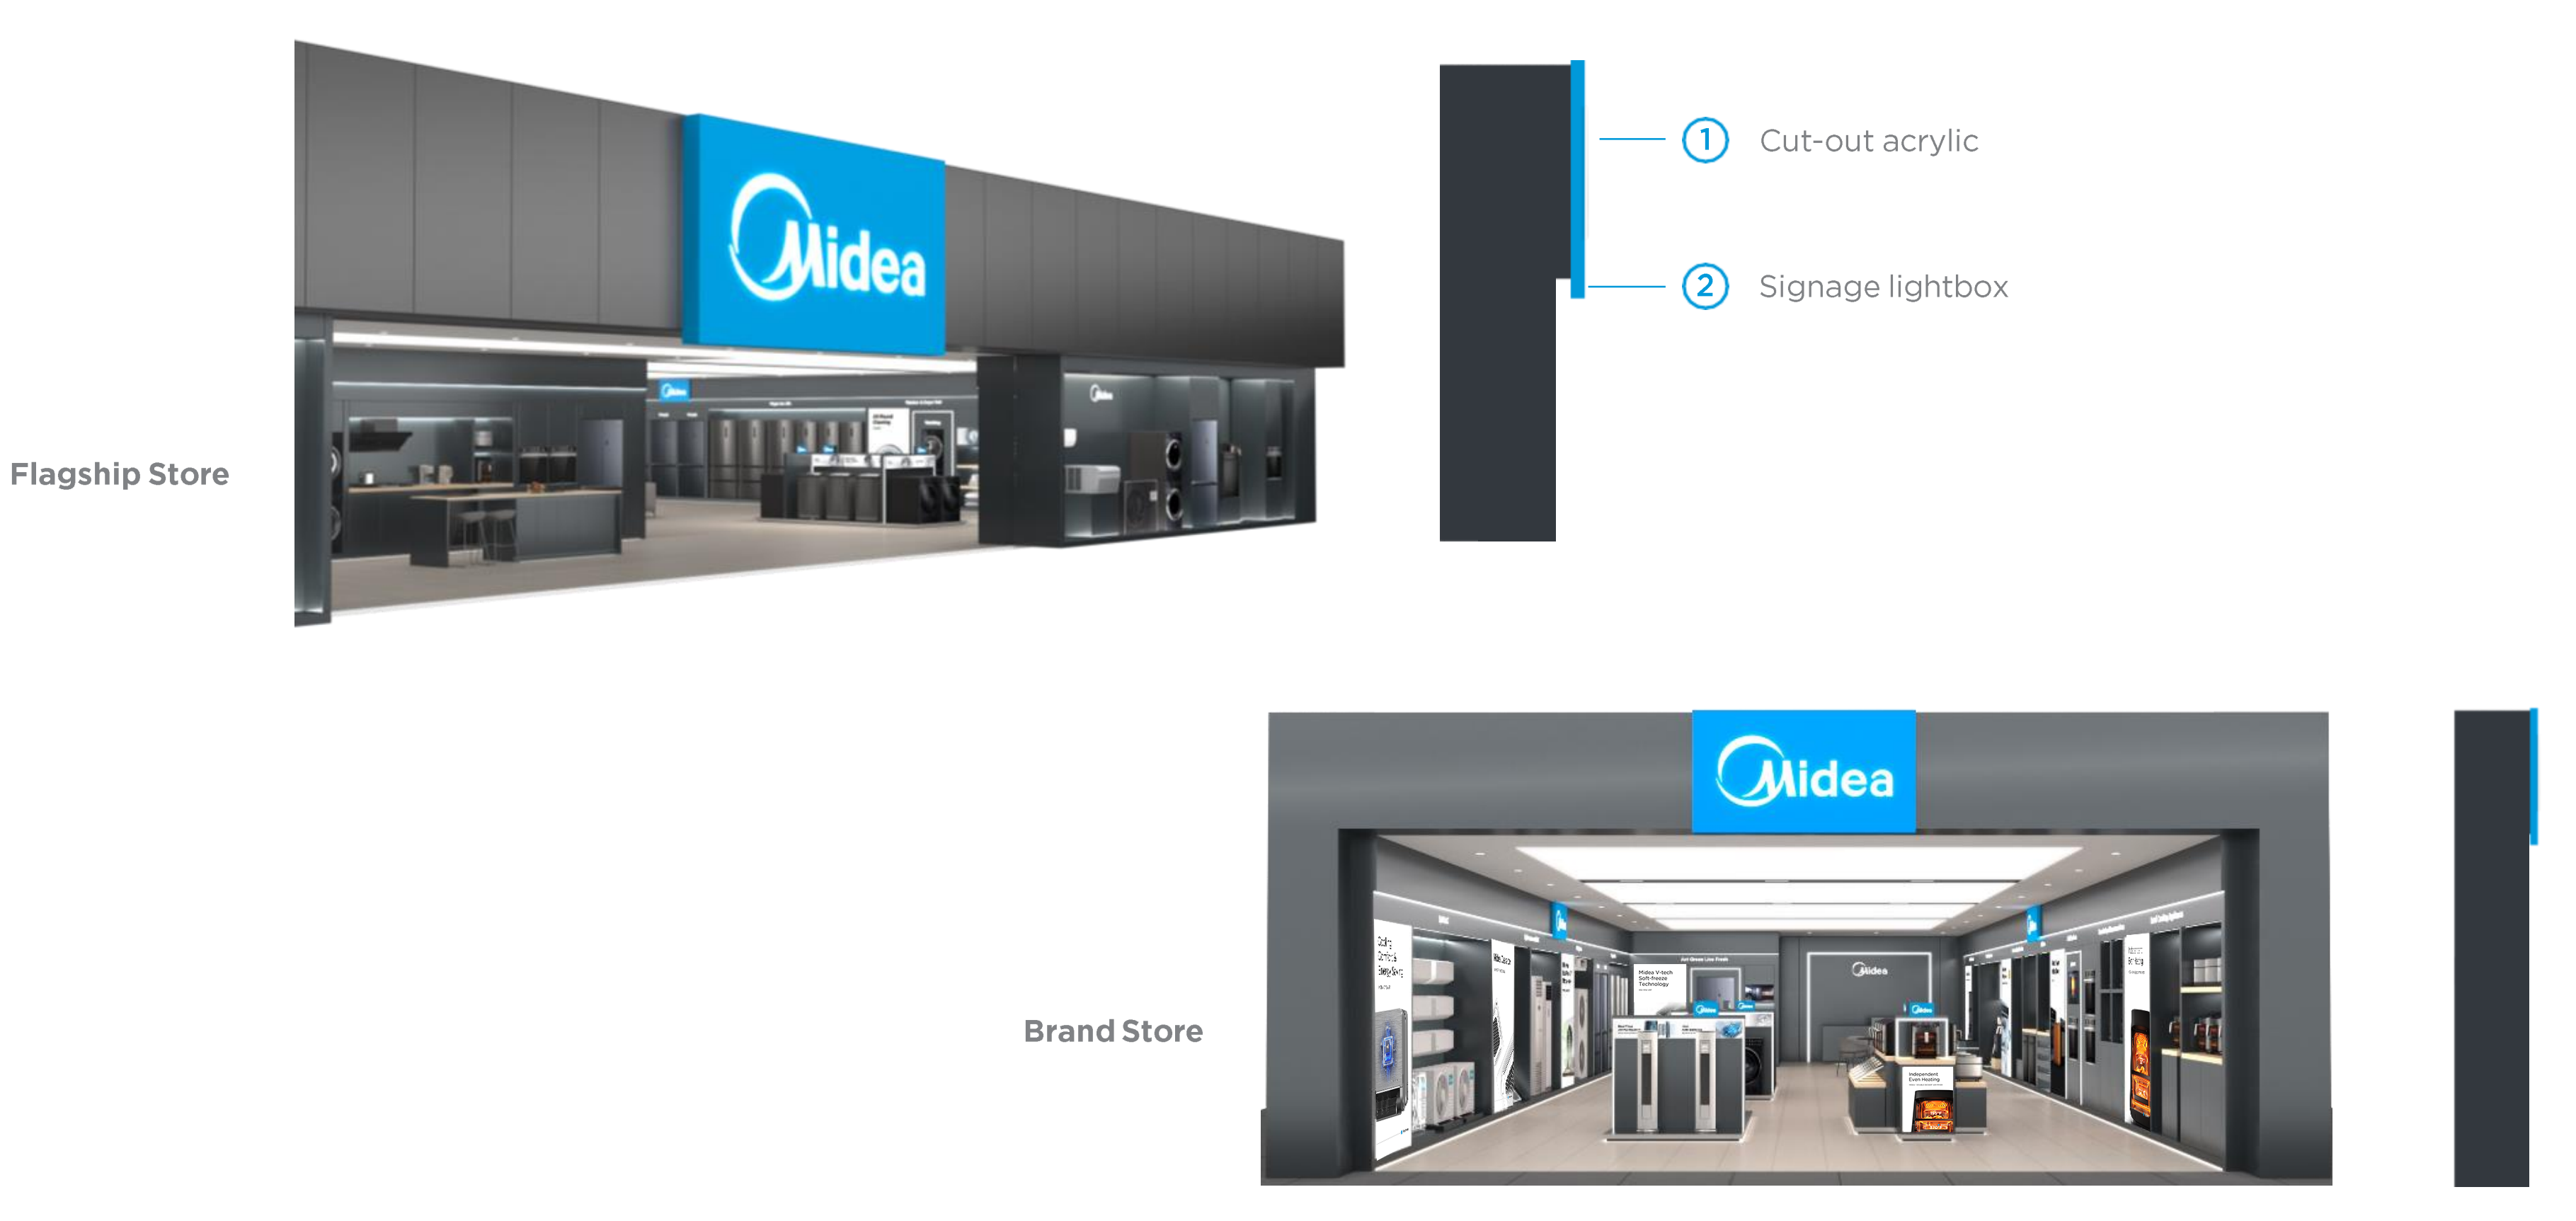
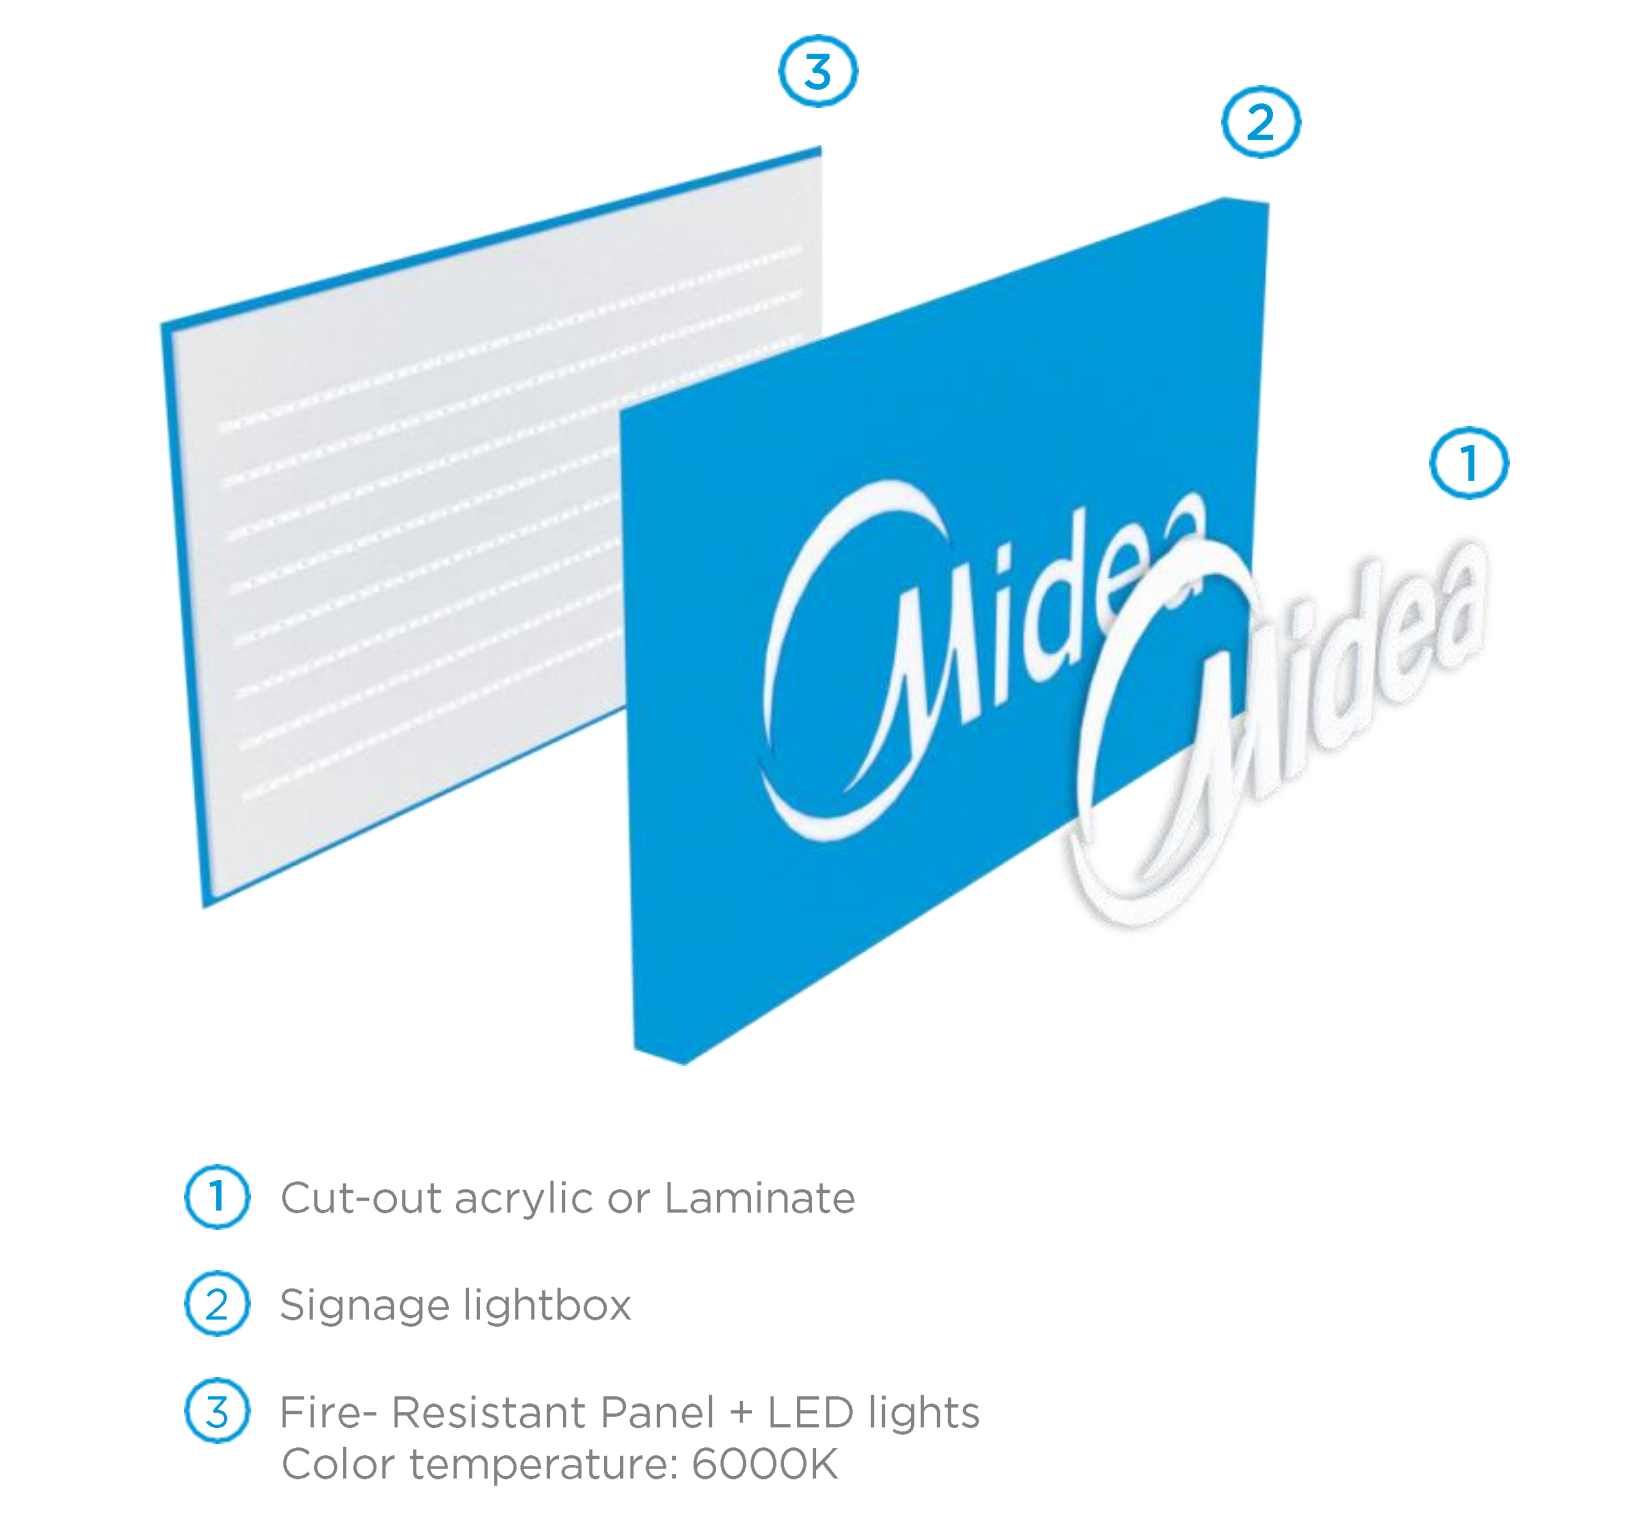
Logo Specifications
- Use Midea's official brand colors and fonts.
- Logo proportions must flushed to the top branding wall tiering of 500mm.
Cut-out Logo on Acrylic or Laminate Finishing
- Computer Numerical Control (CNC) precision cut for clean edges and accurate logo representation.
- Logo cut-out on a durable external material with Midea Pantone Blue on a matte surface.
Translucent White Acrylic
- 5mm thick, UV resistant acrylics for durability and optimal light diffusion.
- Logo cut-out on a durable external material with Midea pantone blue on a matt surface.
- White LED lights arranged in a grid pattern on the back panel to ensure even illumination.
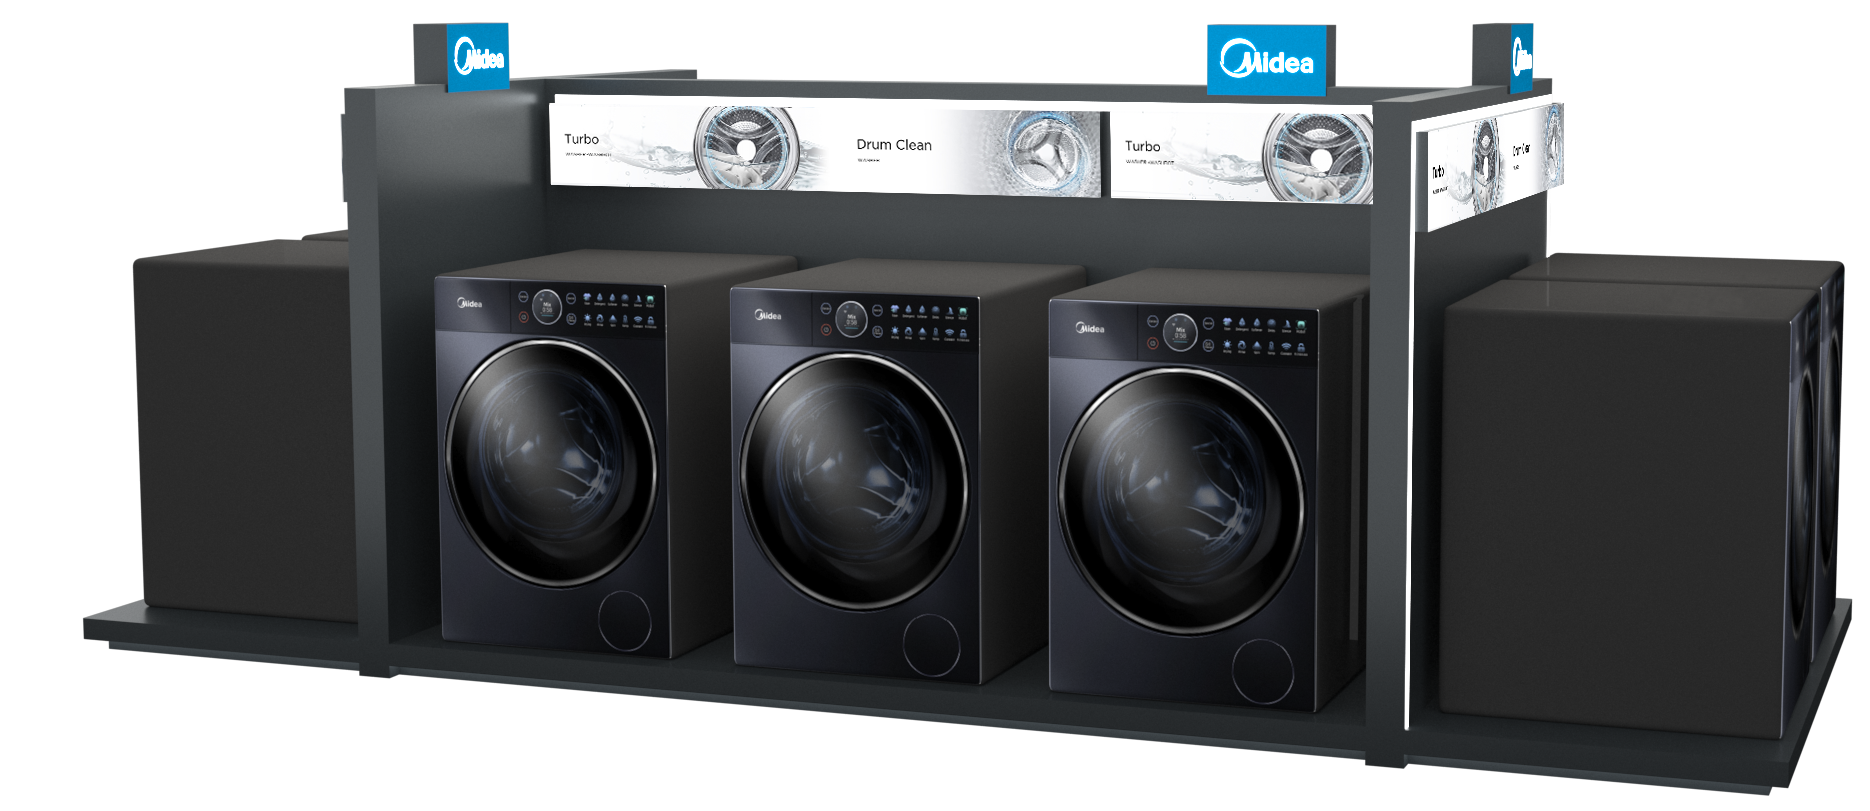
Design
The standardization of islands fixtures ensure consistent branding and visual elements across various store environments. This approach allows for adaptability to different store sizes and configurations while maintaininga unified brand identity.
Fabrication
Uniformdimensions for the island's structure to streamline manufacturing and installation.
Adaptability
Design the islands to be flexible and scalable, to accommodate different store sizes and layouts.
Branding and Logo Placement
Standardized Placement: Maintain uniform size, spacing and position the brand logo in top island fixture.
Configuration Guide
Modular configuration guide that allows for easy adjustment of elements to fit various store dimensions.
Planogram Hierarchy: Focal point on the island to highlight key products, followed by a set visual hierarchy to organize products and categorization.
Fabrication Guidelines
The visual displays offer a choice between a graphic panel with a standard print or a backlit print for use in a lightbox
LED color temperature: 6000K
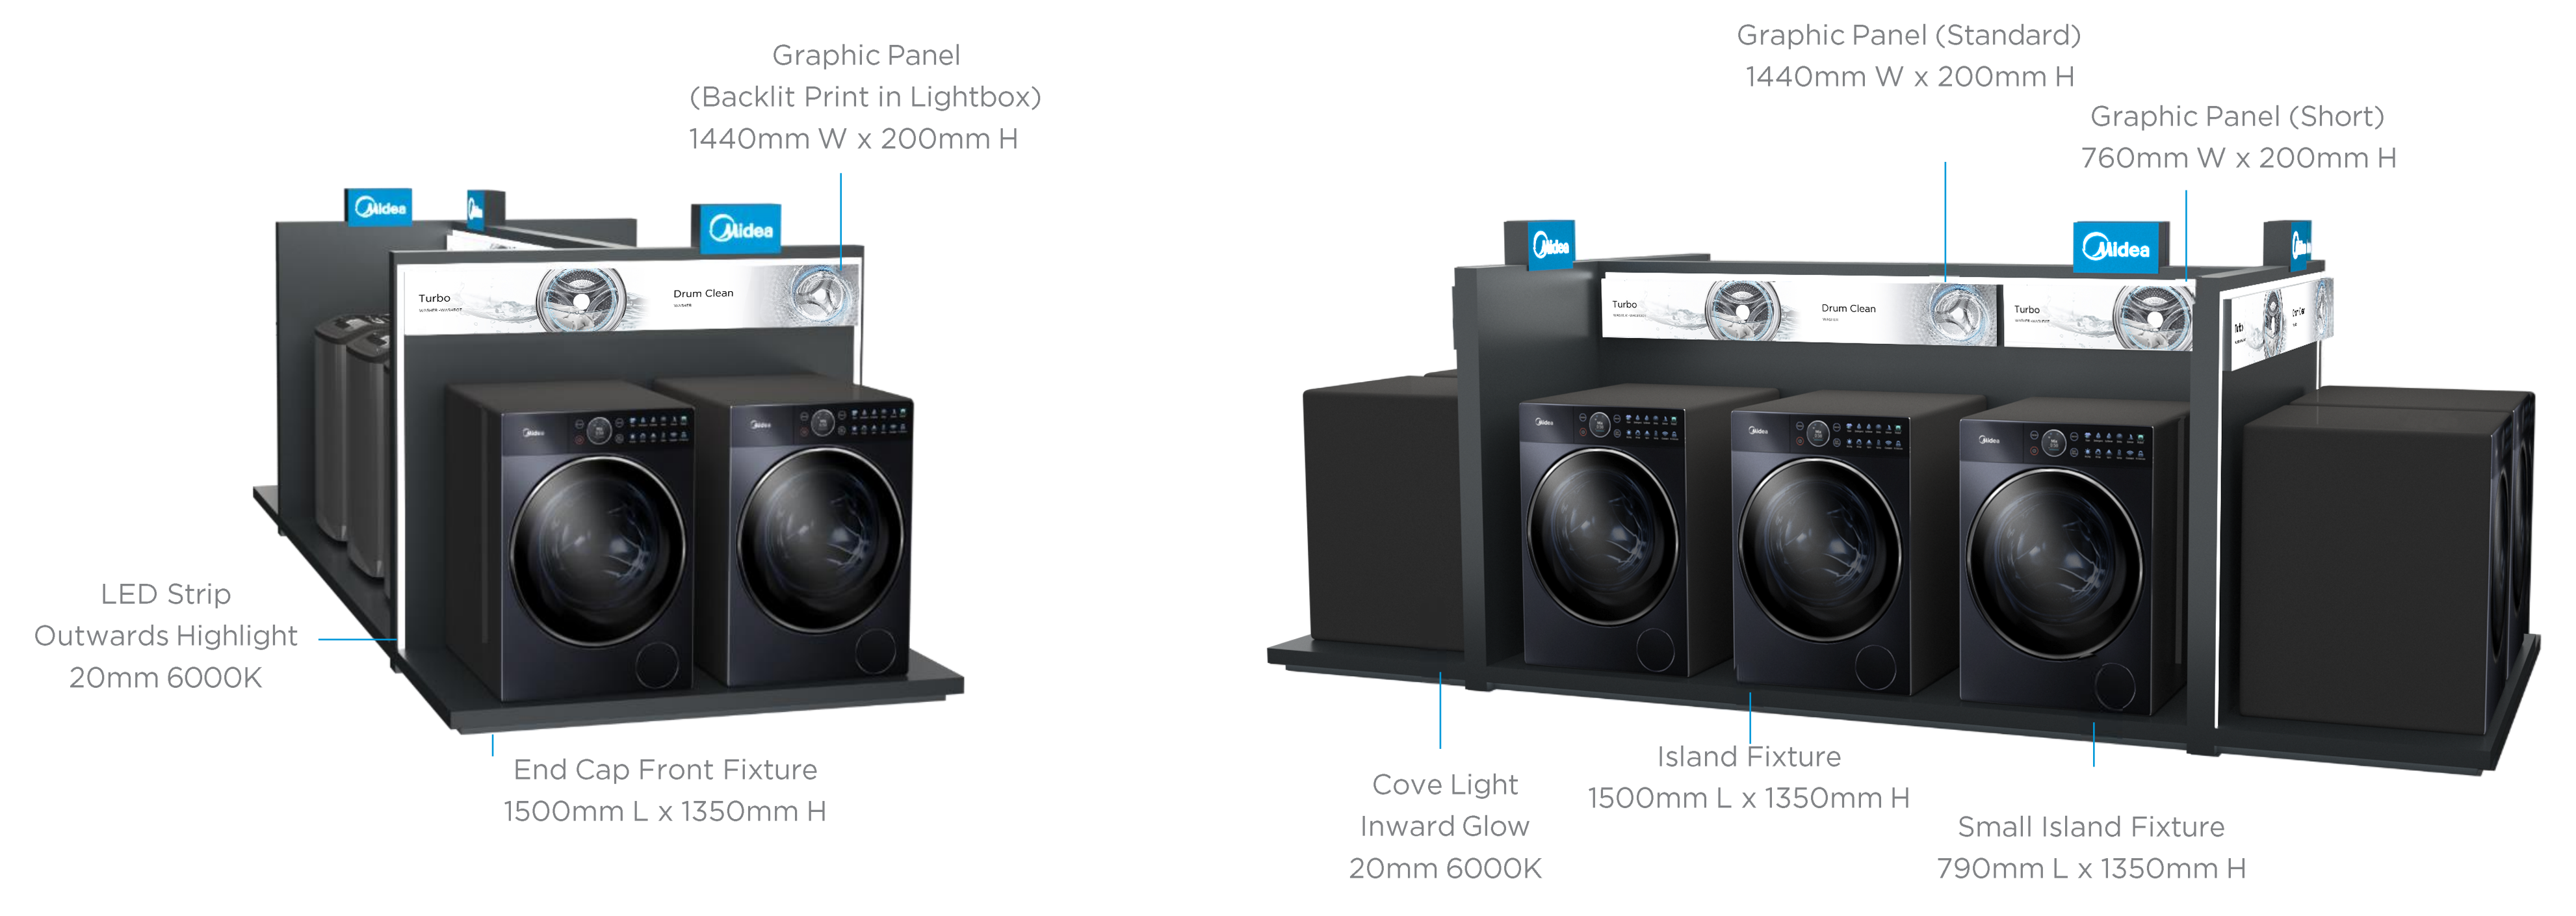
Configuration Guidelines
Logo Specifications
- Use Midea's official brand colors and fonts.
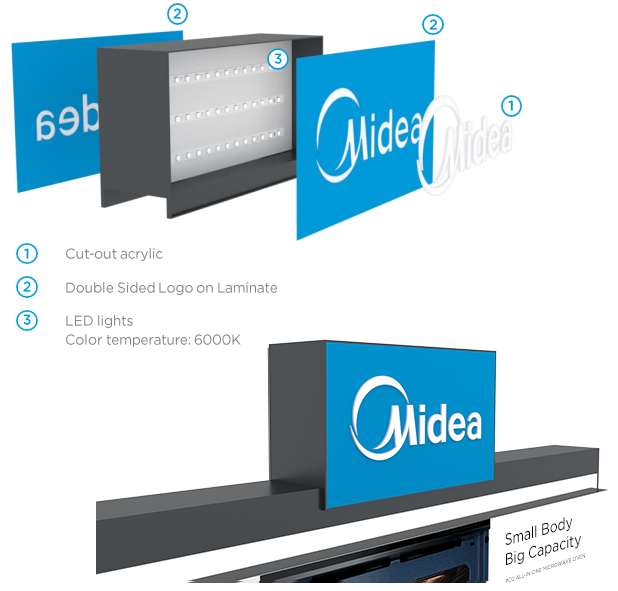
Double Sided Logo on Laminate
- Computer Numerical Control (CNC) precision cut for clean edges and accurate logo representation.
- Logo cut-out on laminate.
Translucent White Acrylic
- 3mm thick, recessed in for durability and optimal light diffusion.
- Logo cut-out on laminate with Midea Pantone blue on a matte surface.
- White LED strip lights (6000K) arranged in a grid pattern on the back panel to ensure even illumination.
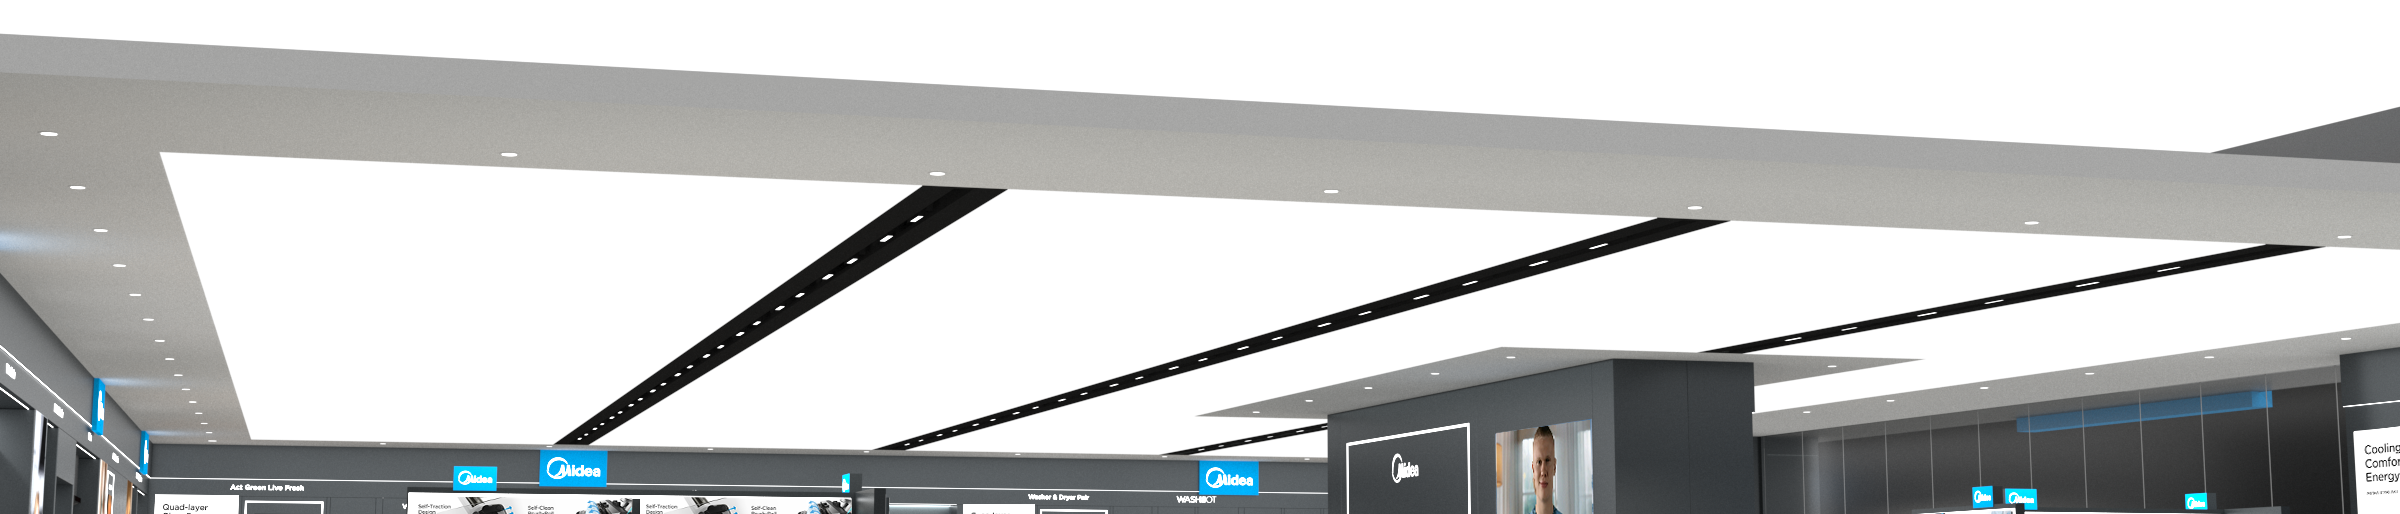
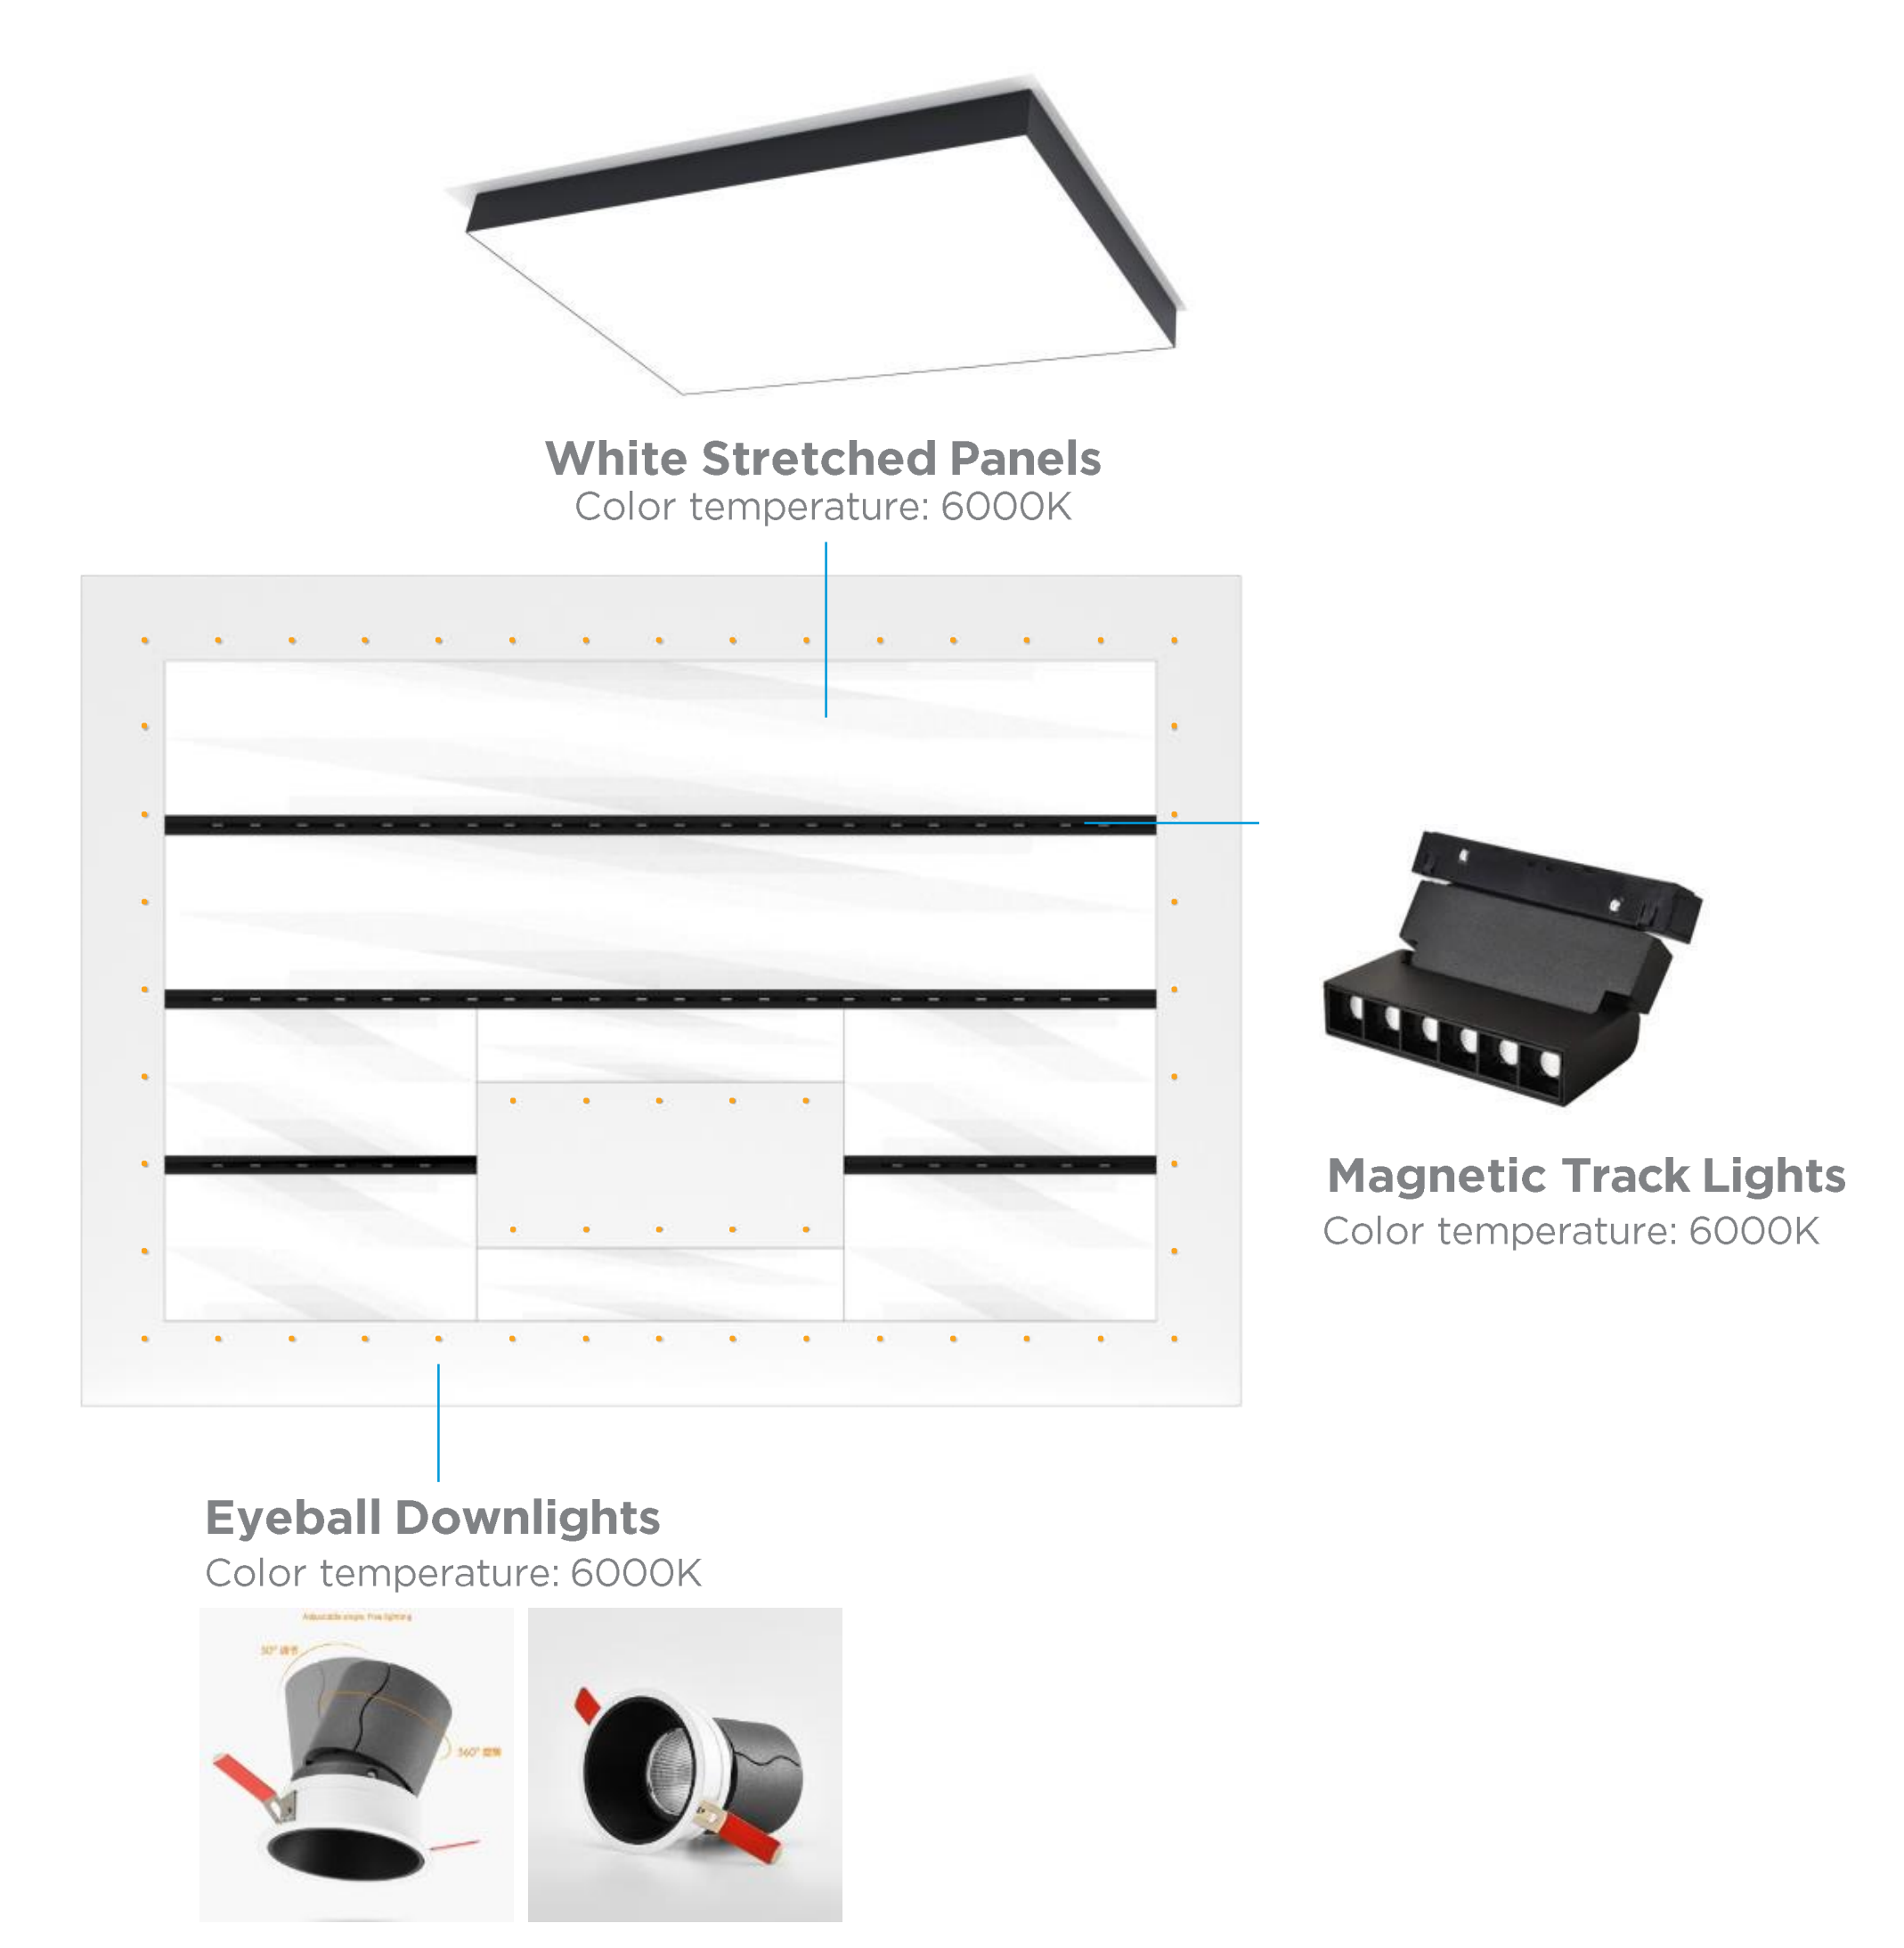
The ceiling design features three distinct lighting types, each an essential element to the store's aesthetic and functionality:
1. White Stretched Ceiling
These paneIs envelop the store in a soft, even glow, creating a serene and inviting atmosphere. Their expansive coverage and minimal celling lines enhance the sense of space, making the store feel open and elegant.
2. Magnetic Track Lights
With the flexilbility to cast spotlights precisely where needed, these lights bring products into sharp focus. The magnetic track system allows for imaginative lighting arrangements, adding a dynamic and visually intriguing layer to the store's design.
3. Perimeter Downlights
Strategically placed around the store's edges, these adjustable lights highlight products on the wall bays. They create an eye-catching spotlight effect, ensuring each item stands out beautifully and draws the attention of shoppers as they navigate the store.
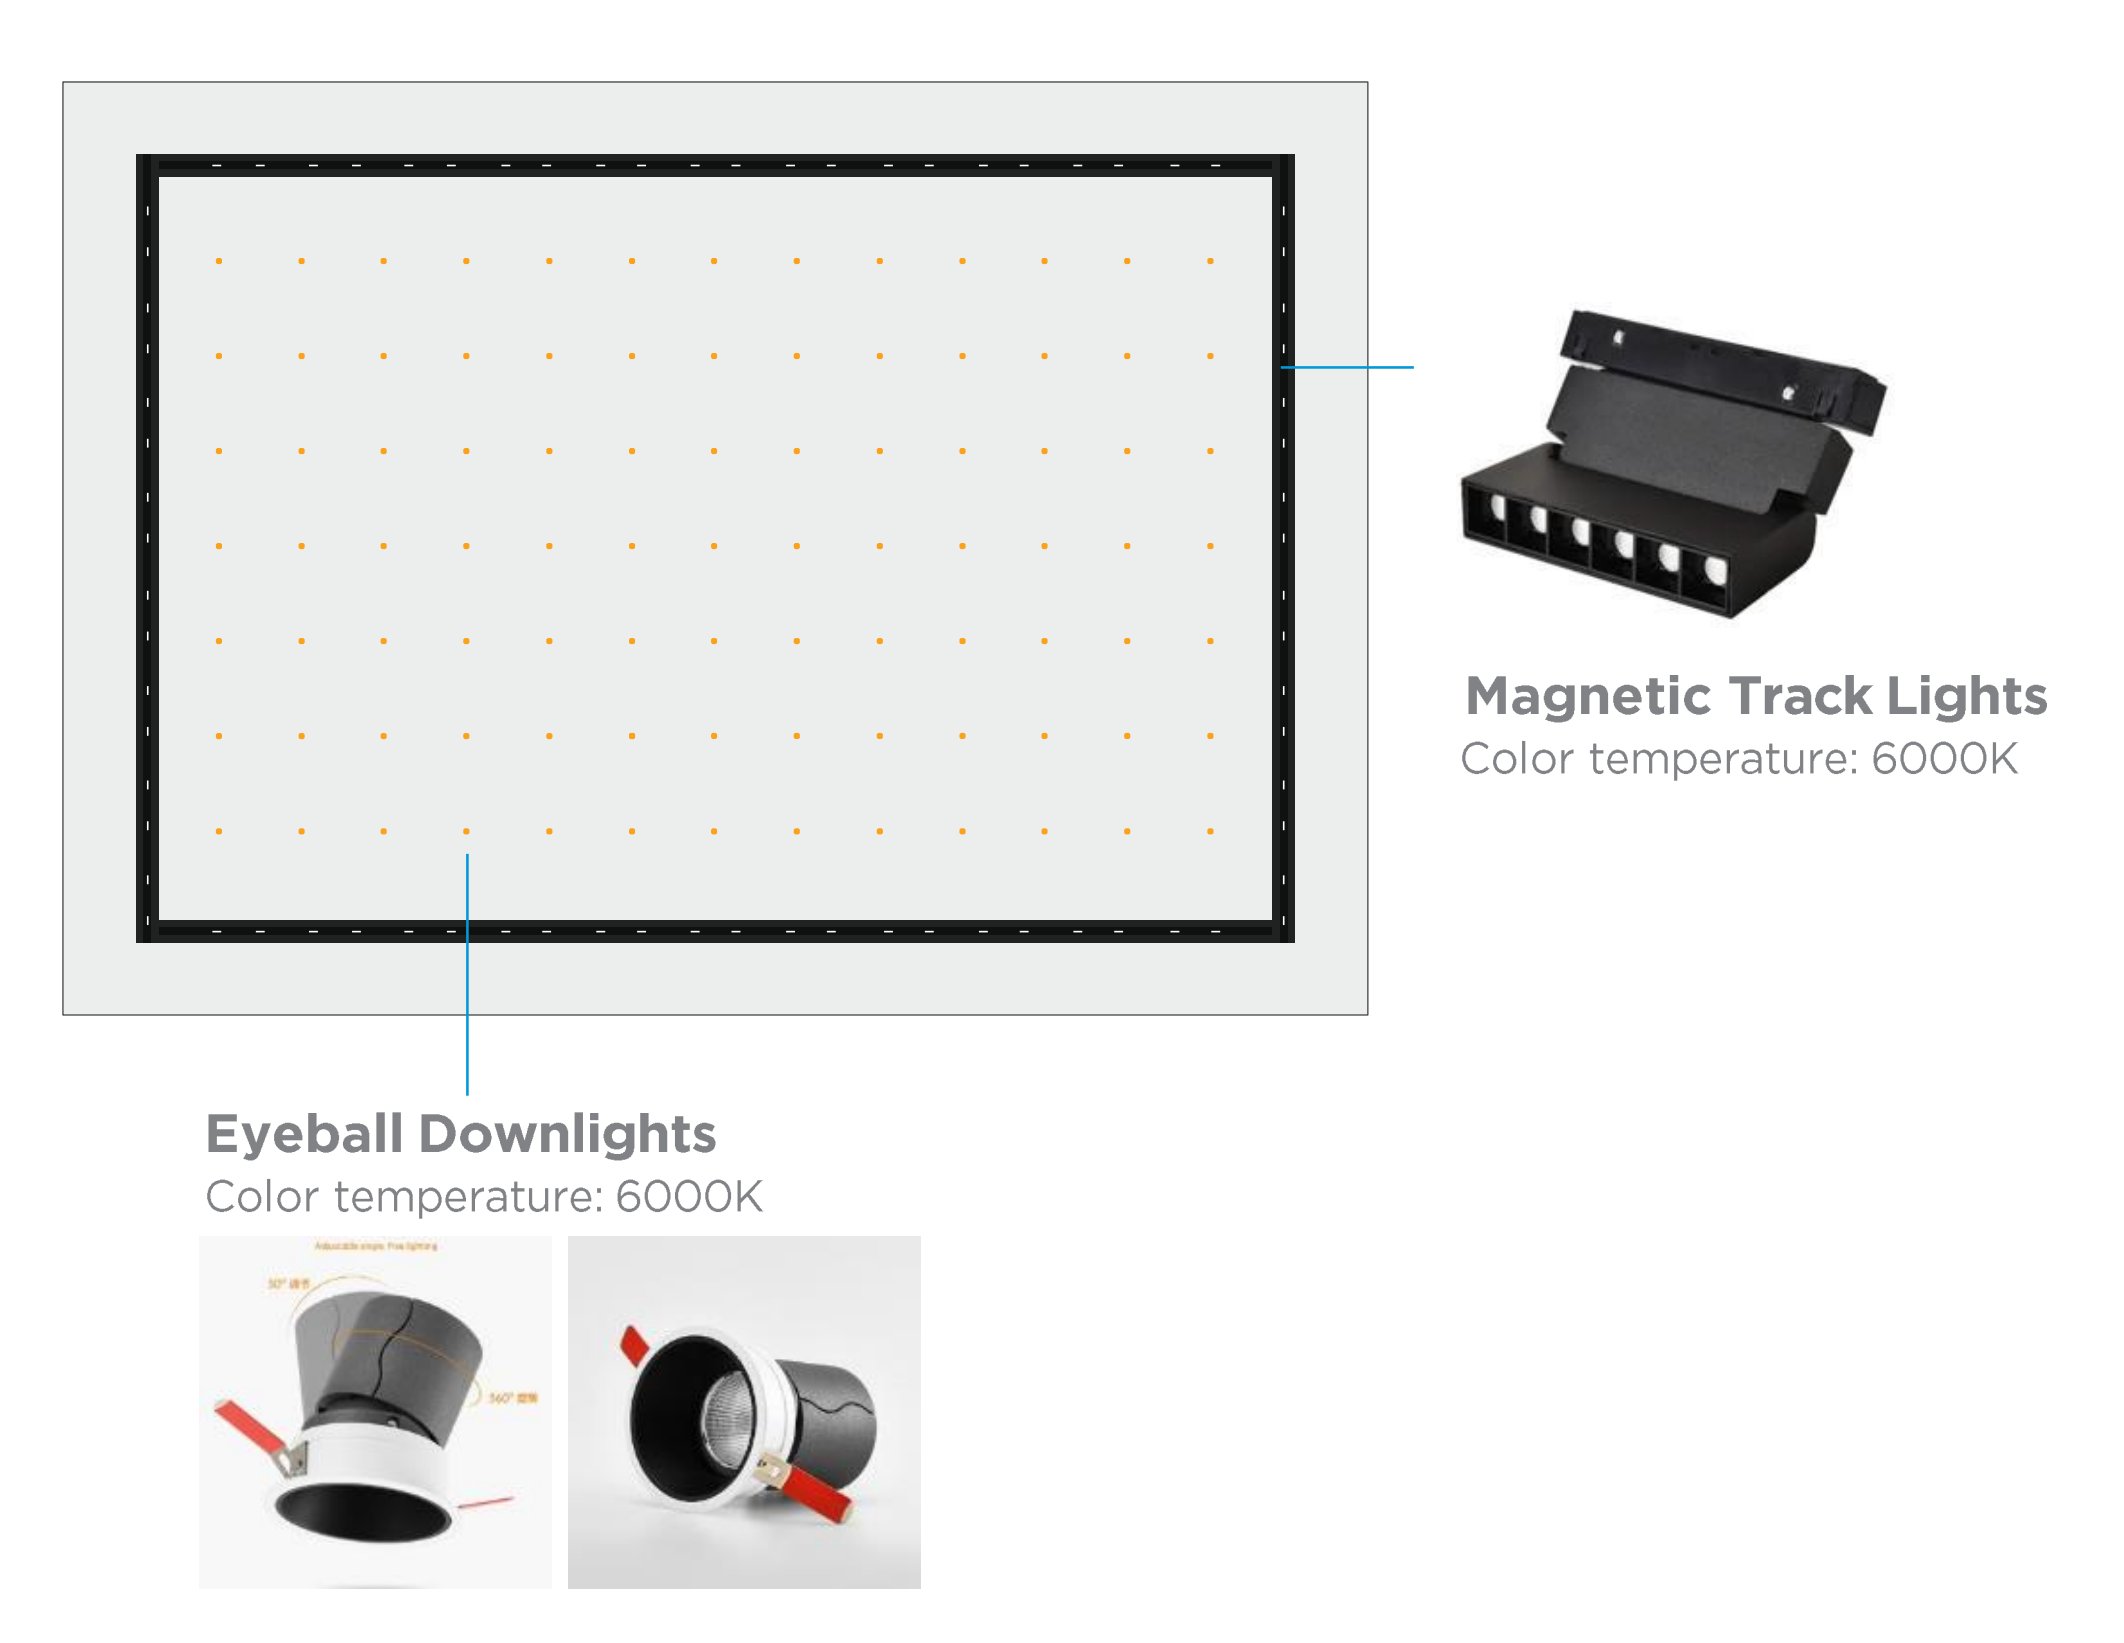
Magnetic Track Lights
Housing Material:
Durable aluminum housing, ensuring lightweight strength and effective heat dissipation. It delivers high luminous power for bright, focused lighting, ideal for accentuating products with precision.
Installation:
A magnetic track ceiling light installed in the center of the store ceiling provides targeted illumination, enhancing the visibility of products. This flexible lighting solution allows for easy adjustments, ensuring optimal focus on featured items. Its sleek design seamlessly integrates with the store's aesthetics, creating a modern and inviting shopping environment. Recessed into the ceiling for a clean, seamlesslook.
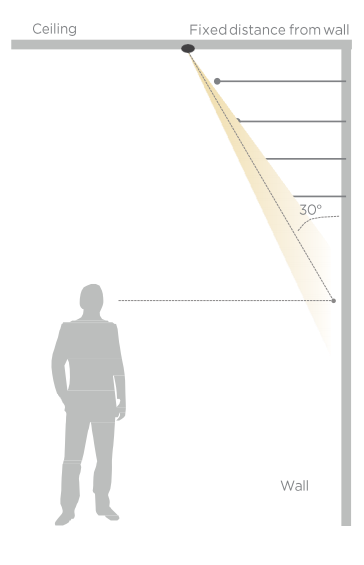
Perimeter Eyeball Downlights
Housing Material:
Die-cast aluminum with a powder-coated finish.
Installation:
Beam angle at 30° angle from downlight to center of display, taking center point at eye level of a 1.7m adultheight.
Adjustable downlights are selected to accommodate changes in product display. They are installed in the curve transition between the wall and ceiling to bring attention to the product.